3 Ways to Label Your Shoe Boxes

Hi, Christel here from Space to Love, and it’s been a while since I have written a blog on organizing and decorating. I’m glad to be here today and share a quick tip on 3 ways to label your shoe boxes.

My closet is pretty organized, but I wanted to take it one step further by adding pictures of the shoes to the boxes.

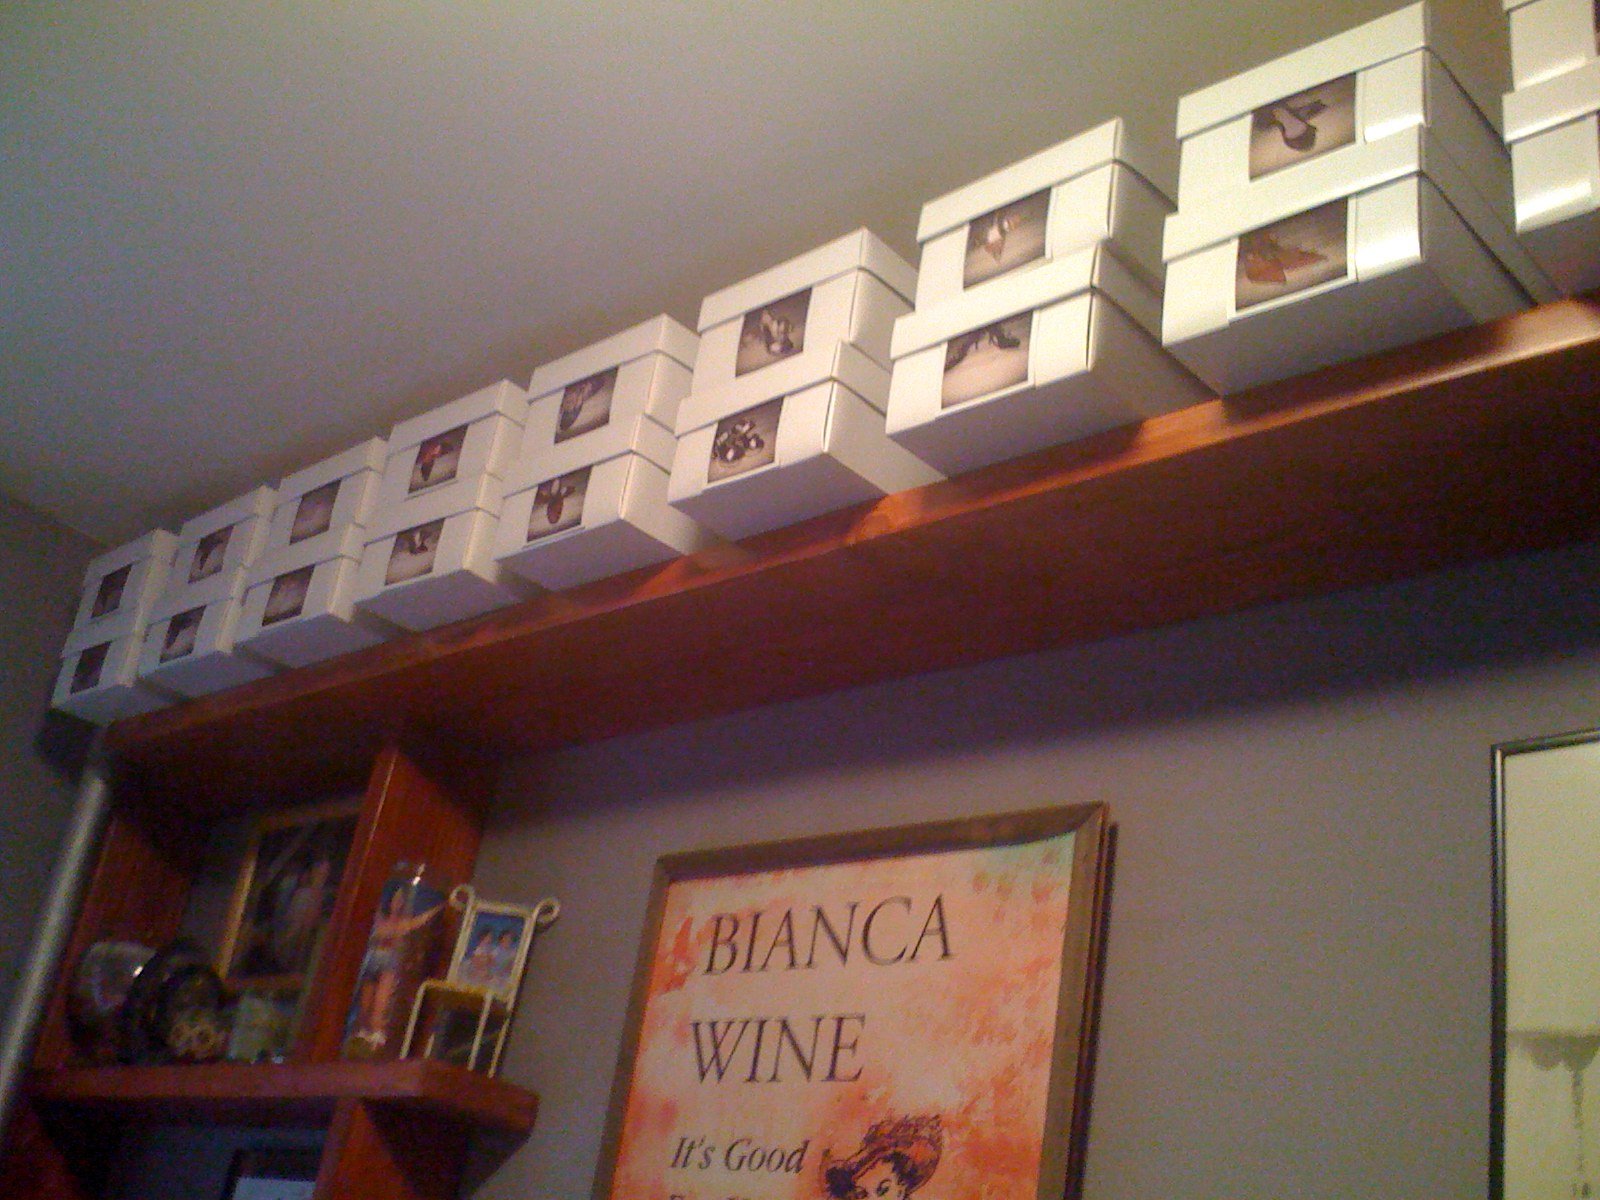
I used to live in New York, the East Village, in a really, really small apartment. My bedroom was only 6’ x 9’; it’s all about the location and not the space when living in Manhattan. Anyway, for my shoe organization, I bought white shoe boxes from Uline, then I used my roommate’s Polaroid camera to take pictures and double-sided tape to attach them to the boxes.

Fast forward to today, and living in Los Angeles, my room is a little bigger, and I actually have space in my closet for my shoes. Yay!

I have clear bins from the Container Store and am no longer using the white Uline boxes. However, I find it hard to see exactly what shoes are in what box when looking down in front of my closet, trying to get dressed. So, I thought I would recreate the NY shoe system here in LA.

Watch the video below, or keep on reading.

I don’t have a Polaroid camera or a roommate anymore, but I do have a mini photo printer with 2” label tape that prints sticker photos. I went ahead and took pictures of all my shoes, printed them out, and adhered them to the clear shoe boxes.

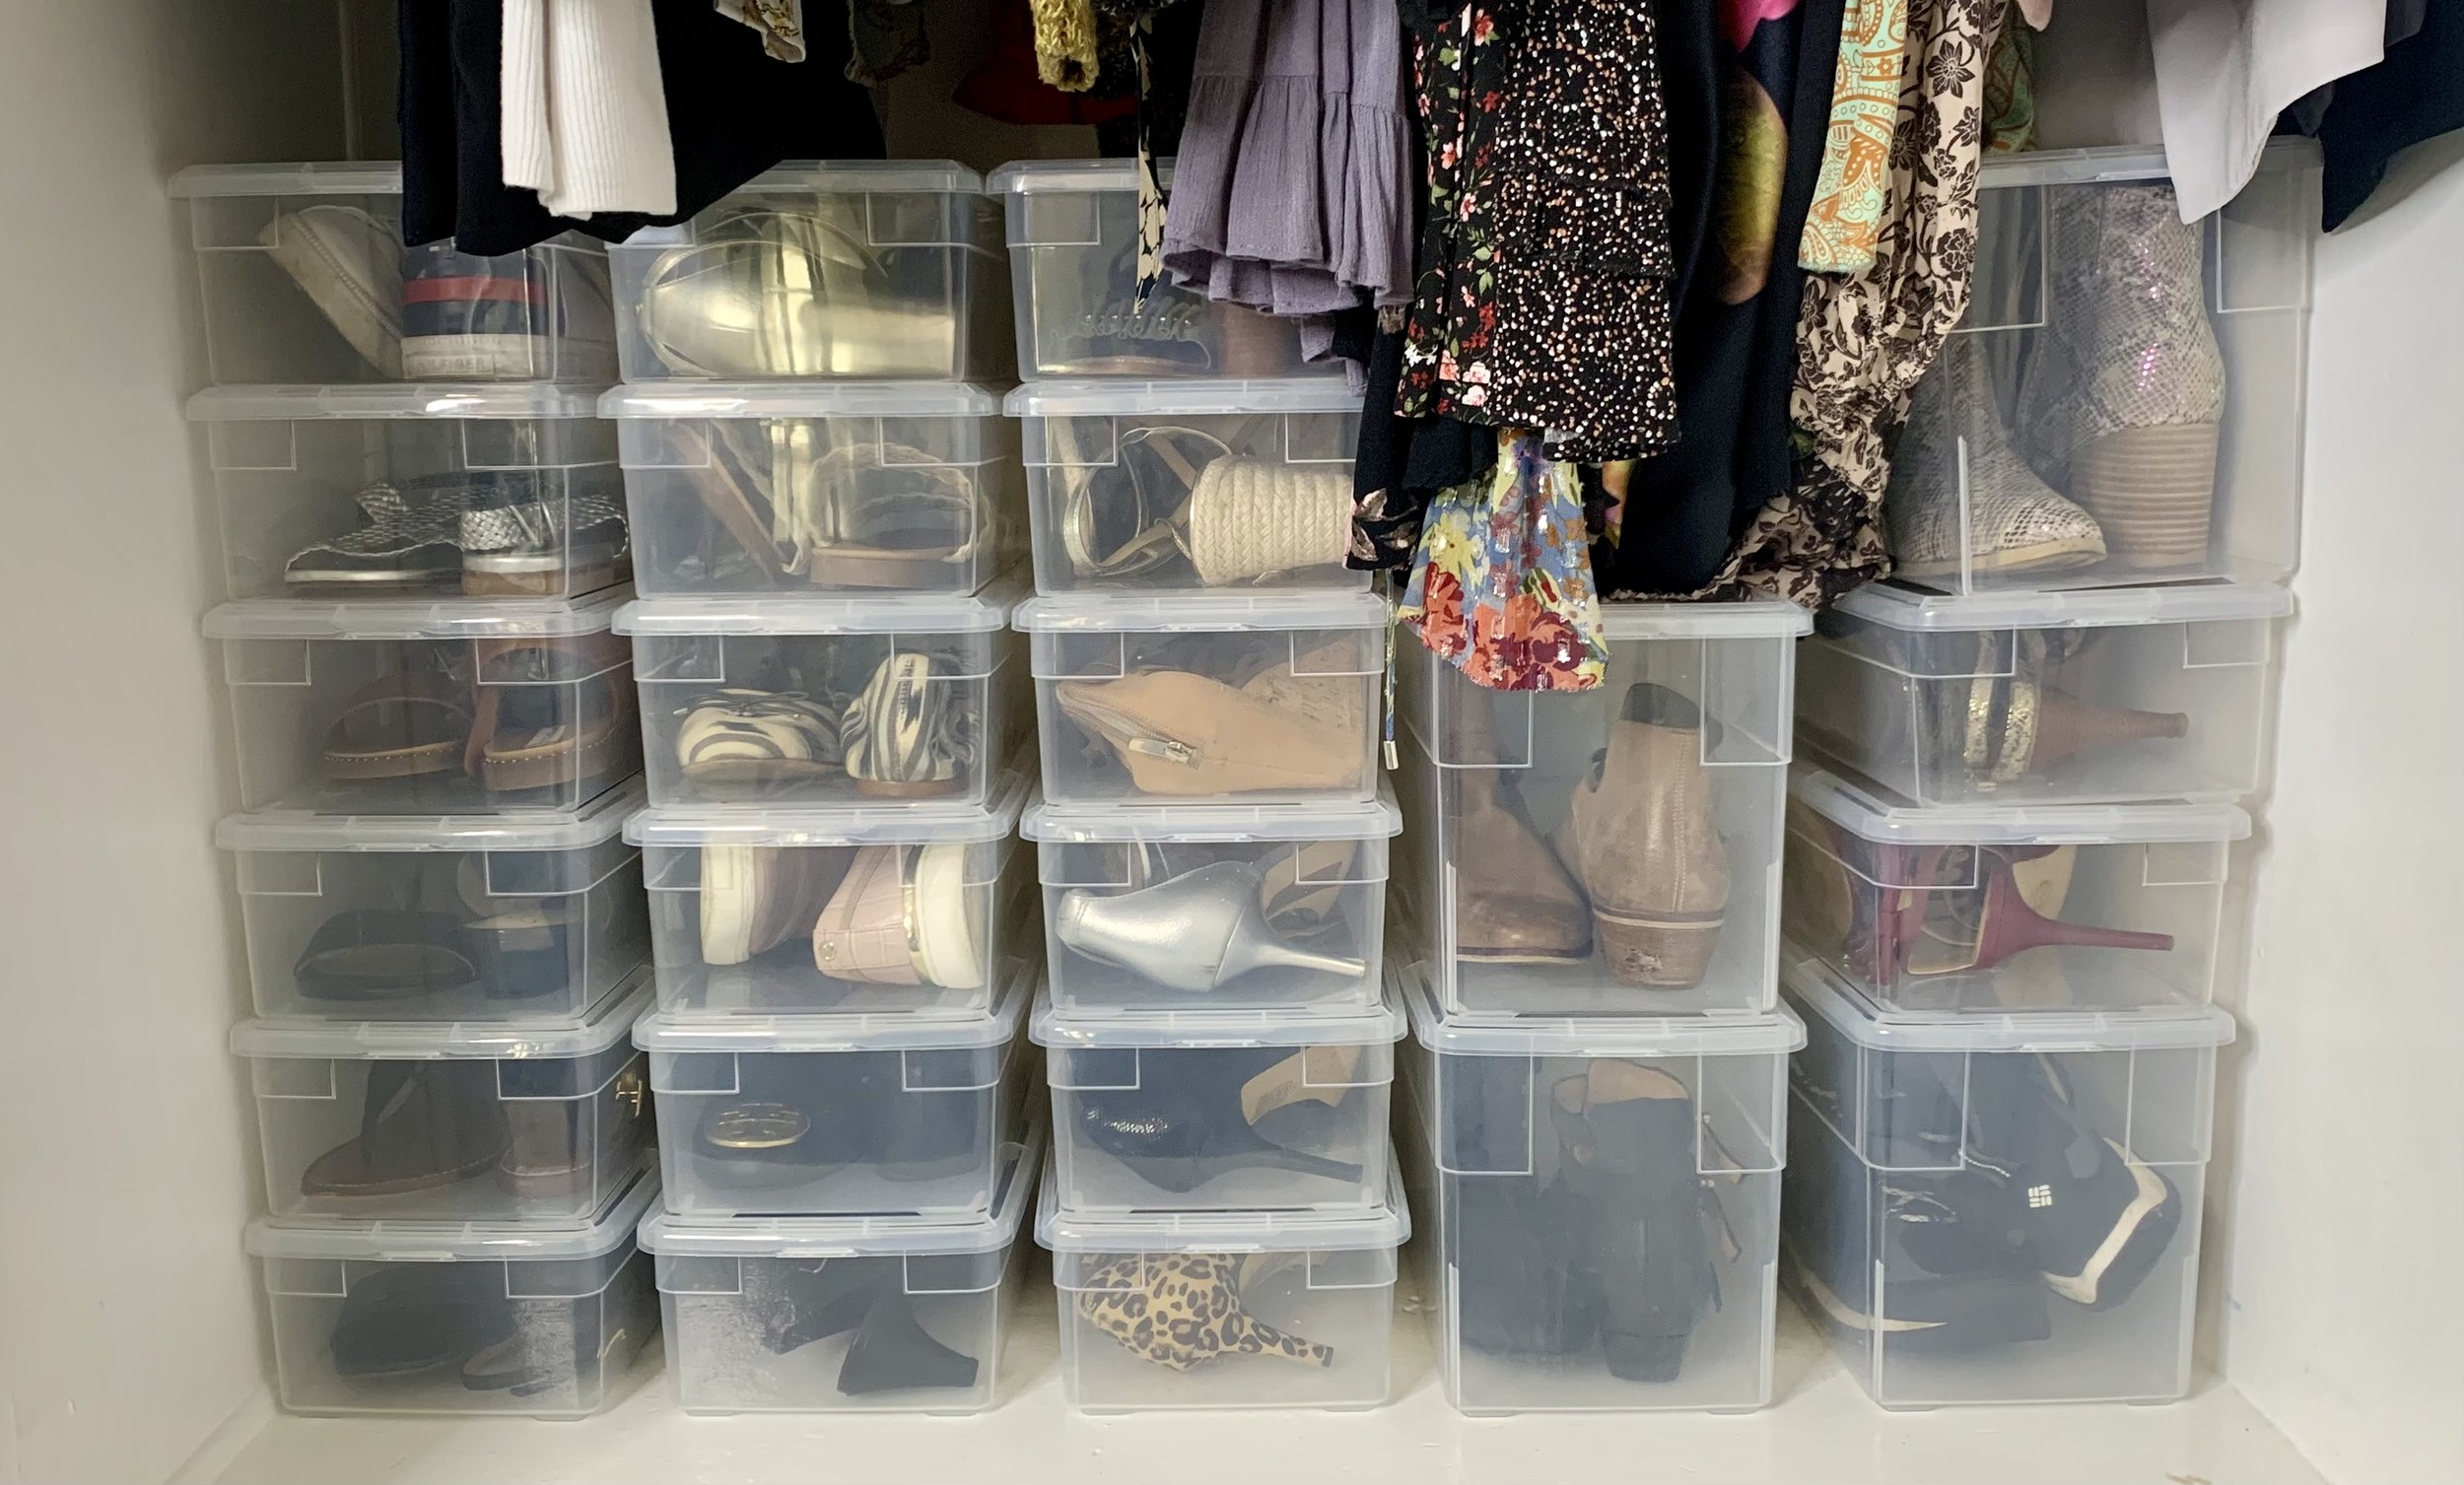
Space to Love - Before Clear Shoe Bins

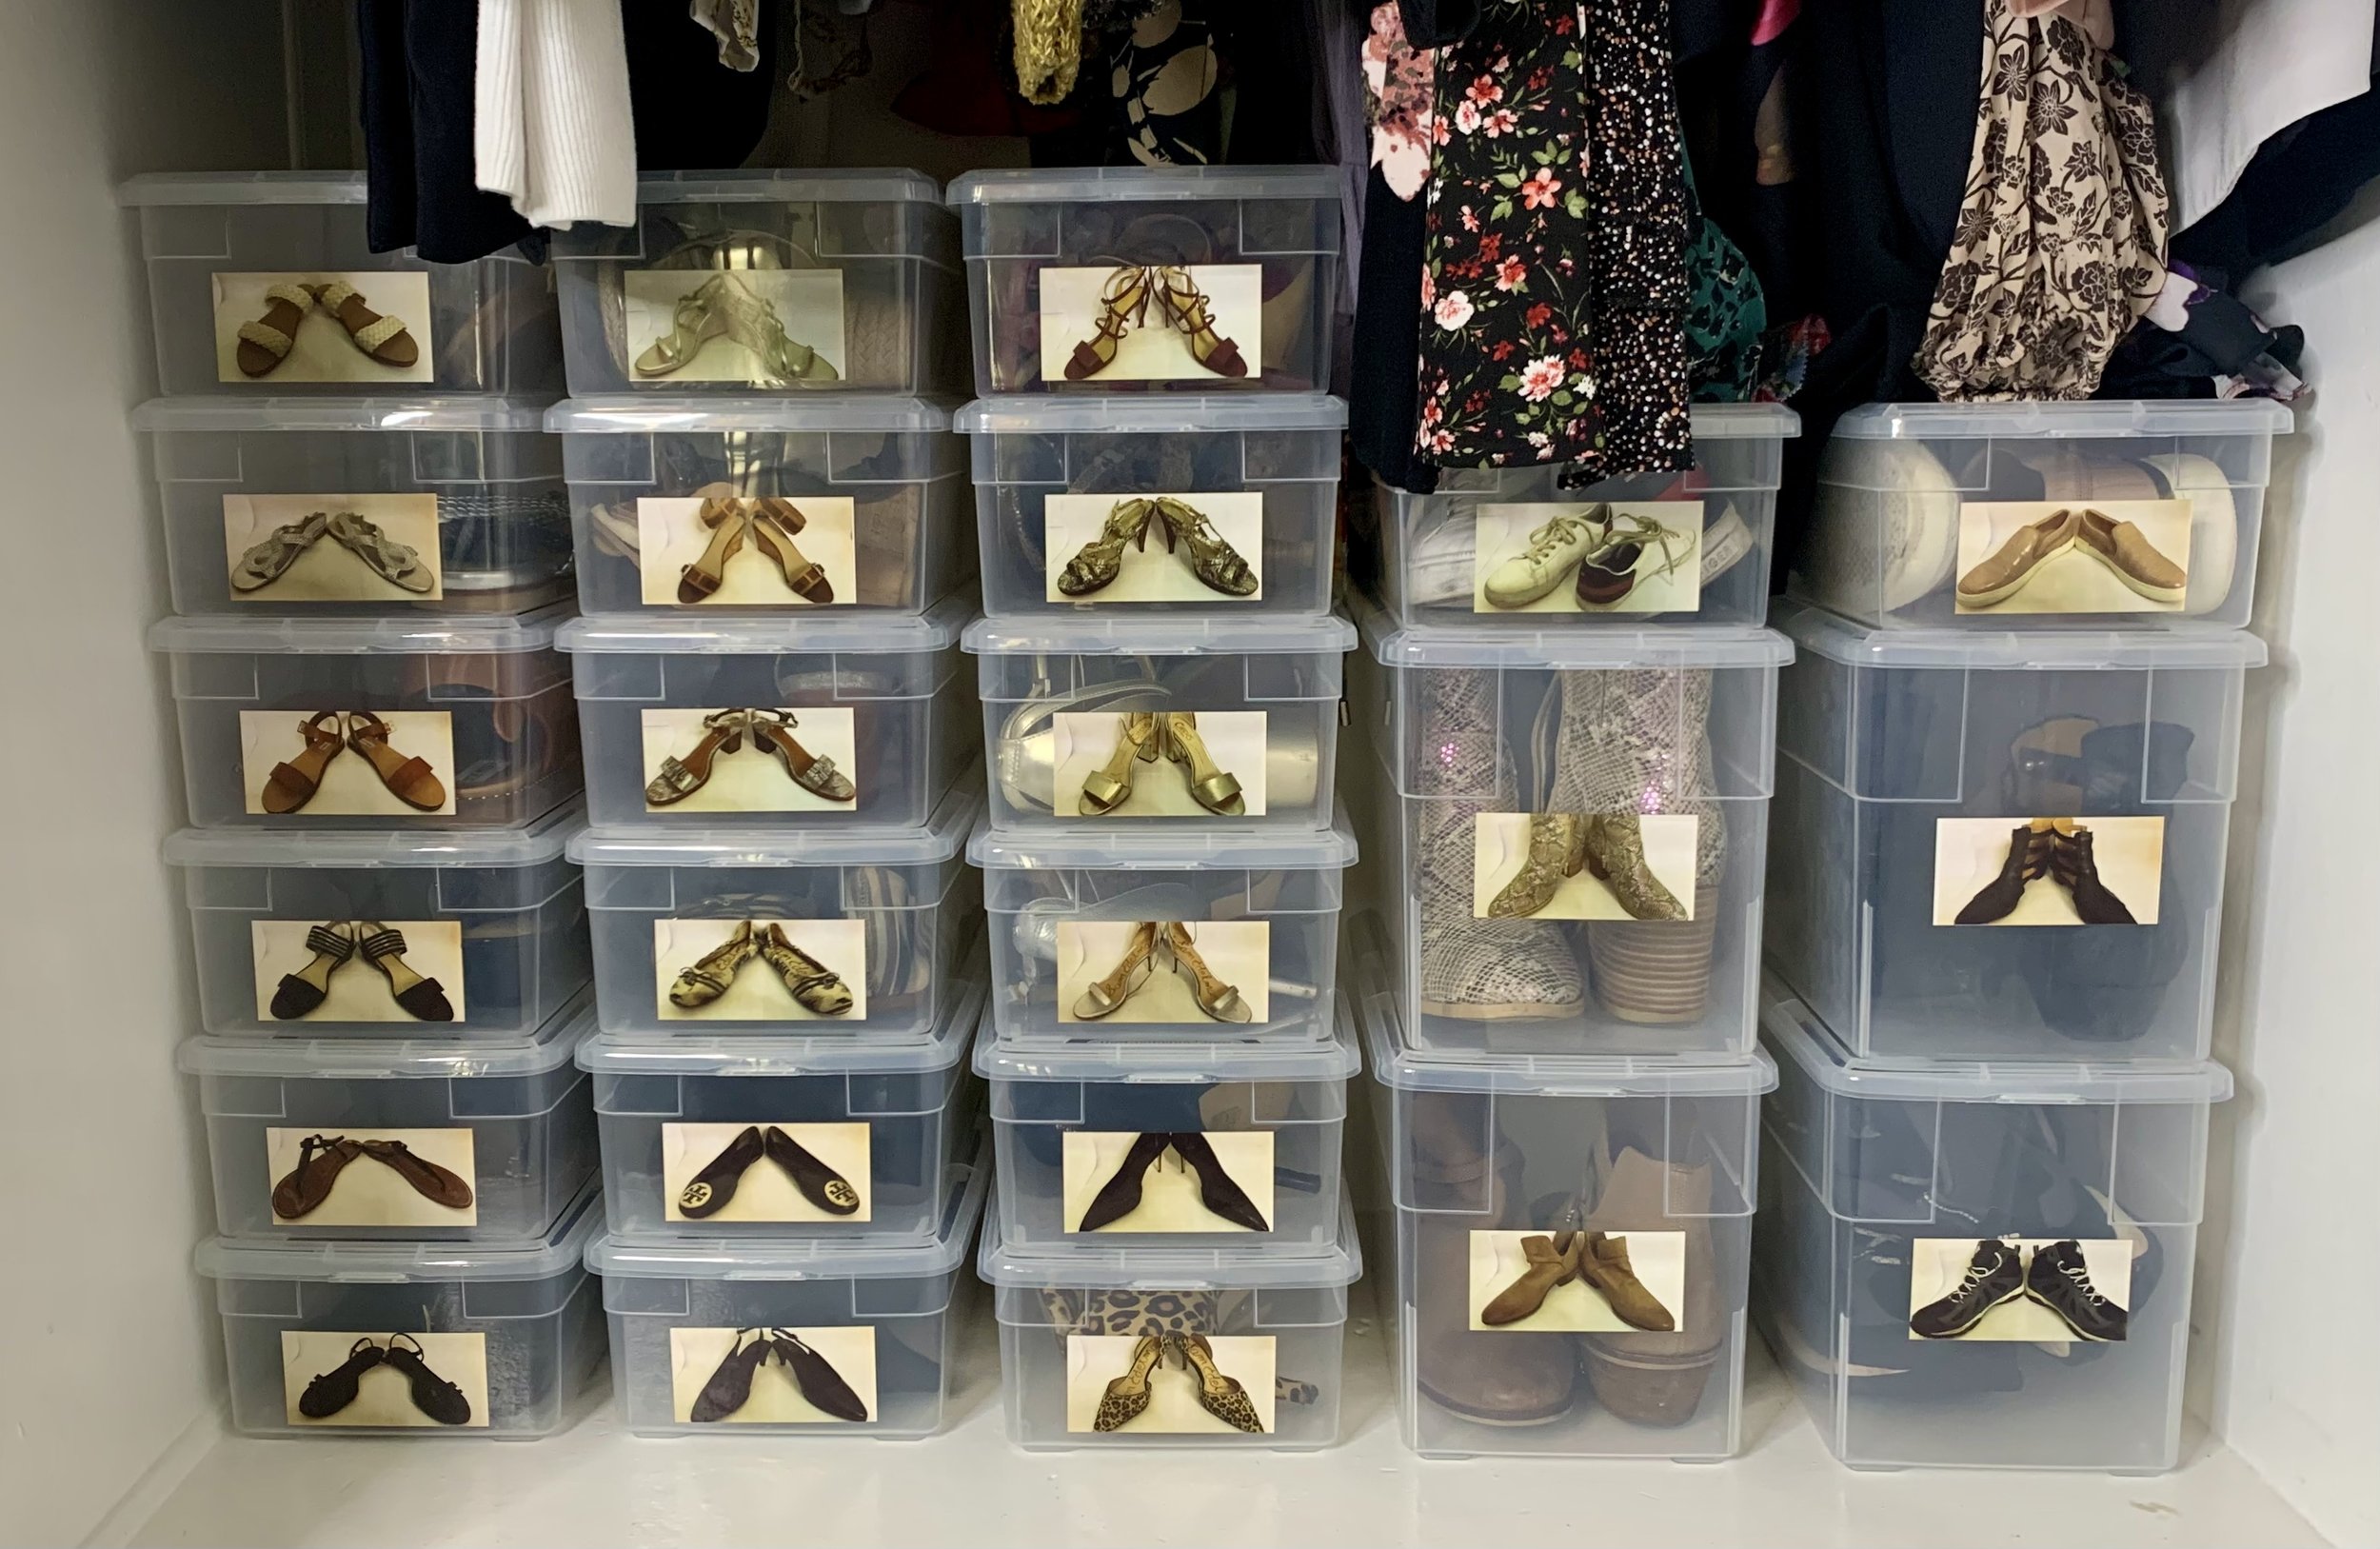
Space to Love - After Clear Shoe Bins

Another way to achieve a similar look is to use a regular printer and then laminate them. I uploaded all my pictures to my computer, put them in a Word doc, made each photo 2”x3”, and then printed them out. I used a laminator and paper cutter from Amazon and double-sided tape.

Space to Love

The 3rd way is by using the old favorite, a label maker. This will make sure you know which pair of shoes go back into which box. I would print a label that says the designer’s name and then another to go underneath with the style of the shoe, i.e., Calvin Klein, Gold Wedge. This will make it clear, and you know exactly what’s in the box. Now, your shoes will always go back to where they belong, and this will help you stay organized.

No matter which way you go, make sure your labels are nice and straight:)

Keeping them in bins helps you stay organized, but also, putting them in categories in the closet will help you find what you’re looking for faster. It’s all about saving time. So instead of just randomly putting them back, put them back in categories, i.e., sandals, flats, work heels, dressy heels, boots, sneakers, and so on. Create categories that work best for you.

When I'm looking for my sandals, I know what row to look in and find them quickly. I don’t have that many shoes, so it's not crazy necessary, but when you have triple the amount of shoes or more, it's really great to make your categories and organize your shoes that way. You will thank yourself for it.

Some people ask me, “How many shoes do you have?” or “What do you think the perfect amount of shoes is?” and I think that you want to live within the means of your space. I started this project with 30 pairs of shoes. With that amount, I don't feel like I'm overflowing at all, and I think I'm living within the means of my space. I’m also not overwhelmed by having too many choices when it comes to what shoes to wear; this can be very time-consuming. There are only so many decisions you can make in a day, don’t waste them on what shoes.

All the shoes I do have, I wear and love them. However, I will never pass up an opportunity to go through and do a little decluttering if I can. As I take the pictures of the shoes, I will ask myself these questions…

1- When was the last time I wore them? If longer than six months, Do I plan on wearing them again? If not, donate.

2- Do they hurt my feet? Is it worth it…probably not, donate.

3- Are they in style and still represent who I am? If not, donate.

4- Are they too worn out and can’t be fixed? If yes, trash.

While asking yourself the questions above…feel free to try on all your shoes and walk around; this will make it easier to make those decisions.

I did get rid of two pairs of shoes. I actually liked both of them, but I wore them out too much, so they have definitely seen better days, and I had to let them go. I'm now down to 28 pairs of shoes. I just made some room for new things to come into my life:)

I hope you found this helpful and inspiring. Do you have any shoe-organizing tips that you'd like to share with us at the Space to Love community? Please comment below; we would love to hear from you. Happy organizing!!

How to Create More Space in Upper Kitchen Cabinets

As a professional organizer, I know that most people don’t have a lot of time. So I created some quick tip videos to help you get the information you need in just under a few minutes. Here is one on how to create more space in upper kitchen cabinets.

Below are the before and after pictures and links to the products. All you need to do is take everything out of your cabinet, wipe down the shelves, add the museum putty (from Amazon) on all four corners of the base of the riser shelves (I got the shelves at target) and then place the risers in the cabinet and secure in place. Start putting all your items back, with the extra space you will have more room to add items and get to things easier.

Hope you found this helpful. Let us know what you think:)

How To Organize Your Pantry

I love organizing and I love to travel. As a professional organizer, I sometimes get to do both. This pantry was in Malibu, CA. In this video, you may actually be able to hear the ocean in the background.

Pantries are one of the most satisfying areas of the kitchen to organize. It’s amazing how once you declutter and create categories, then put them back into the pantry, what a big difference it makes. It helps you save time, money and be less stressed. When it’s time to cook, shop, or just look for a quick snack you are fully supported by a well-organized panty.

In this video, I go through the Space to Love® 5 Step Method on how to organize your pantry.

Setup, Sort, Select, Sanitize, Style™

4 Quick tips from the video I want to share.

1 - Take everything out.

2 - Create categories for all your items and group them together.

3 - Get rid of everything that is expired.

4 - When putting food into airtight bins cut out the directions, write the expiration date on it and keep it in the bin.

Watch this short video below for the full process.

This is not the first video I have done on organizing a pantry and it probably won’t be my last:) I really can’t help myself!

I hope you found this helpful and we’re always looking for new ways to improve. What organizing tips do you have for the panty that you would like to share? Leave a comment below. We would love to hear from you.

Client Video Testimonial for Space to Love

April fools day:) You thought you were going to get another quick tip from Space to Love....sorry, no organizing tips today but all kidding aside....

Instead, I had the rare privilege of interviewing one of my long time clients and that is no joke! It’s a fact, most people don’t want others to know that they hired a professional organizer let alone talk about it on camera.

Sofia is amazing and one of the first to find and hire me on Yelp. While we had lunch in this beautiful park, we got to talking about all things organized and what we had accomplished over the past 6 years.

I’m so grateful for the time she took out to do this and that she could answer some questions that a lot of potential clients would always ask. Here are some of the things we talk about in the video.

*Once we are organized do you have to keep coming back?

*What is your method?

*Do I have to get rid of everything?

*Are all organizers alike?

*Can I maintain the organization on my own when we are done?

*What about memorabilia?

*Will I feel judged?

*What is the best thing about hiring a professional organizer?

I hope you enjoy this video of us going down memory lane.

Life is a journey, and as you can see from this video, that journey is so much better when organized.

How to Have Better Pot & Pan Placement in Your Kitchen

Did you know that the best place to keep your pots and pans in the kitchen is right by the stove. I know you’re saying, “Of course, where else would you keep them?!”

Yet, so many times I go into a client’s kitchen and other items are in the cabinets right by the stove. This happens time and time again and at no fault of their own. I find that it’s because when they move in they may not be the ones unpacking and that the moving person might not care where the items go or they’re in a rush and put anything anywhere and think the homeowner will change it later.

Well…I hate to say it but that “later” never comes. I know this to be true because when I get into my client’s cabinets and ask, “Are these here for a reason? Because I think I they will be more useful in another area.” The response I hear is usually, “Oh wow, I actually never thought about changing it” or “It was like that when we moved in and we just left it that way” or “I know it’s not working but I didn’t know how to make it better.”

Once I change things around for them they can’t imagine it ever being the other way again.

In this short video we rearrange two cabinets in this kitchen that my client was so thrilled about…sometimes it’s the little things that make a big impact.

What can you switch around in your kitchen today that would make your cooking life a whole lot easier? If you need any suggestions don’t hesitate to reach out to us. We are here to help when you’re ready:)

How to Organize Your Gift Wrapping Supplies

It’s January and that means it is the official Get Organized Month! Do you have any organizing goals you would like to accomplish this month? If yes, start small with a junk drawer, spice cabinet or a coat closet….

I had so much fun working with this client in New York organizing her coat closet that was also part gift wrapping closet. You never know what you are going to find or what is the best organizing solution until you get in their closets and see what’s going on. However, it didn’t take any time at all with this closet because when I saw all those rolls of wrapping paper and ribbons and bows I knew right away what organizing system this closet needed.

As you watch the video below you will see how we used the Space to Love® 5 Step Method to get this coat/wrapping closet whipped in shape. Then we added the Elfa Gift Wrap over the door rack to help my client get and stay organized.

I hope you found this useful and feel free to share your organizing goals with us. We are here to help:)

Happy Get Organized Month!!!

Want to Lose Weight? Start by Organizing Your Fridge:)

Happy New Year!! I’m so happy to see 2020 in the the rear view. While it has been a tough year for most of us I want to stay positive and look to the future.

We all have new year’s resolutions, what’s yours? lose weight? Exercise more? Get out of debt? How about getting organized? I can help you with the last one and combine it with the first.

They say one of the best things you can do when starting a new diet or cleanse is to clear out your fridge and pantry. It gives you the opportunity to get rid of all the unhealthy food items and make room for the good ones. In the video below I help my client clear out her fridge by using the Space to Love® 5 Step Method. Through the process we take everything out, sort “like with like” items and get rid of all unwanted and expired food. This client was not going on a diet but the process is the same. Just by following these simple steps you can created more room for a healthier more organized life.

In the video I show a few things to use to help you stay organized but I want to add on to Step 5 - Style, here are some more items to help keep your refrigerator organized.

Long Bins - Container Store, Target, BedBath&Beyond, and Amazon.

Stackable Drawers & Containers - Container Store, Target, BedBath&Beyond, and Amazon.

Stackable Containers for Leftovers - Container Store, Target, BedBath&Beyond, and Amazon.

Lazy Susan - Container Store, Target, BedBath&Beyond, and Amazon.

Drinks & bottle Holders - Container Store, Target, BedBath&Beyond, and Amazon.

Thanks for reading and watching the video. I hope you found this helpful.

How To Declutter Holiday Decorations

The holidays are here and it’s time to decorate! This video is of me helping my client on Long Island, New York get ready for the holiday season by decluttering their Christmas decorations. We go through the Space to Love® 5 step method to simplify the process.

During the video you see my client and I go through two bins, but what you didn’t see is us going through each category pile by pile. During Step 3 - Select, we let go of anything that didn’t work or was broken. Any older decor and kids projects that where no longer displayed for the holidays, but they wanted to keep for sentimental reasons, we added to their memory box. Anything that they no longer wanted and was acceptable for donation, we donated to Angels of Long Island.

During Step 5 - Style, we reused the empty bins and applied labels. Here are some storage ideas for holiday decorations that were not included during the video.

Ornament Storage - The Container Store, Target, BedBath&Beyond, and Amazon.

Holiday Light Storage - The Container Store, Target, BedBath&Beyond, and Amazon.

Wrapping Paper Storage - The Container Store, Target, BedBath&Beyond, and Amazon.

Tree Storage - The Container Store, Target, BedBath&Beyond, and Amazon.

Holiday Decor - The Container Store, Target, BedBath&Beyond, and Amazon.

Most people don’t have time to declutter before the holidays, if this is the case for you then I suggest the following. After decorating take a look around and see what decorations you haven’t used. If you’re not using the holiday decor this year, chances are you won’t use them next year and you can let them go. This will help minimize the clutter from year to year.

Hope you found this helpful and Happy Holidays!!

How To Re-purpose Your Garage For Outdoor Living Space

While I was working with this client in Los Angeles on other projects around their house (See living room makeover), they happened to mention “Well, eventually we want to build some kind of storage in the garage, do you think you can help us with that?” Um…yes, please! I love drafting out closets.

They were already using the garage as an outdoor movie room but stuff starting piling up and taking over the space. I can see why they wanted to add storage. It could be challenging to build out the perfect custom storage closet for this garage/movie room but as a professional organizer and decorator, this happens to be one of my favorite kinds of projects. Here is an opportunity for me to create a space that is a perfect fit for my client, their stuff, and their home.

I’m going to walk you through the Space to Love® 5 step method on how to achieve the perfect custom closet. Starting with the first step, Setup. I like to have all the supplies needed beforehand. I make sure I have markers, scissors, boxcutters, gloves, donation bags, recycle bin, trash bags, and post-it notes for labeling categories. We set up fold-out tables to make sure we had room to spread out and be ready for Step 2, Sort.

The sorting process is going through everything and separating them into categories. For this project our first category was “kids’ stuff”, which consisted of large and odd-shaped toys, crafts, and painting supplies. The next category was “travel”, which included suitcases, dog carrier, and travel stroller. The remaining categories were pool supplies, outdoor cushions, and tools. Once everything was sorted we were ready for step 3, Select.

Now it was easy for my client to go through each category, one at a time, and assess the items. This gave them a clear idea of what they had so they could make decisions on what they wanted to keep and what they were ready to let go of. If you skip the sorting process it makes the selection part slower, overwhelming, and almost impossible to complete. Once they finished selecting what was no longer working or needed, these items were then donated, trashed, or recycled. Now we were ready to move on to step 4, Sanitize.

For this project, Step 4, Sanitize, was easy because all of the storage was going to be newly custom-built. However, we did clean out all the bins that we were going to keep and stacked them on the temporary metal shelving until the storage unit was complete. We liked the plastic bins that were being used for the kid’s organization. I’m all for keeping what is working and didn’t want to change them out.

Now for the fun part, Step 5, Style. The goal here was to use the entire right wall to build the custom-fitted storage closet. Also, have additional storage on the opposite wall around the fridge and add a countertop.

I can’t tell you how exciting it is for an organizer to get to create a custom space for their clients. I was able to make the cabinets wide enough to fit all their luggage and outdoor cushions. All the tall awkward toys had their own shelves. I really couldn’t have done this alone. They had an amazing carpenter on hand that was ready to put all this together. He was very patient with me as I went over every detail, even some odd ones…spiders are pretty bad in LA so I wanted to make sure that there were no openings on top of the cabinets for an Arachno-Ville to happen. He customized the top panel to accommodate the sloping ceilings and closed them off. It was important that all the shelves were adjustable and could be changed as their needs changed. Storing fold-up tables can be problematic, so being able to create a gap between the fridge and wall just wide enough to fit their tables was very satisfying for me. Overall I love the way this project came out and my client couldn’t be happier with the end results.

5 Steps to Organizing Your Pantry

It was such a treat to help this organizing client in Los Angeles get their pantry clutter-free and in order. I’m so grateful that they let me film it, and that I get to share it with all of you. By using the Space to Love® 5 step method: Setup, Sort, Select, Sanitize, Style, it makes it easy to breakdown the process so you can get and stay organized. Check out the video below.

As an alternative to watching the video, below is a quick breakdown of the steps to follow so you can get and stay organized.

Step 1, Setup. Before you go to the store to buy bins or start pulling everything out of the pantry it’s important to take a few preparation steps prior to getting started. You want to make sure you have enough room to work and the proper tools are on hand. You will probably need markers, post-its, garbage bags, donations bags, a recycle bin, scissors, and a box cutter. This will make it easier to stay on track.

Step 2, Sort. Start pulling everything out of the pantry and sort items into like categories. Some common category examples are baking, sides and pasta, snacks, canned goods, etc. Use your post-it notes to label your categories for a quicker sorting process. Pro-tip, check all expiration dates before putting into categories.

Step 3, Select. Now that all the items are sorted into like piles it is easier to make decisions on which items you want to keep. You can donate your unwanted items that are not open or expired to your local church or food bank.

Step 4, Sanitize. Before returning all your selected items back into the panty, it’s so important to give those shelves a good scrub down because these areas rarely get the chance to be properly cleaned. Feng Shui tip, all dirt and dust is sha chi (negative energy) and should be removed to promote more positive energy in your home.

Step 5, Style. Most of my clients want to purchase containers and decorative items for the pantry before they even start step 1. However, it’s important to wait until after the sort and selection process because you will have a better understanding of what is going back into your cabinet. Step 5 is the time to take measurements and purchase organizing products such as bins, baskets, etc. Once you’ve bought the bins and baskets for the pantry you’ll want to label them with the different categories. Place your items back in the proper categories and this will help you stay organized.

What do you think? By using these steps will it make it easier to get and stay organized? Comment below.

From Chaos to Comfort: A Living Room Transformation

How many of you have a room in your house that is being used as a storage unit? If you could remove the chaos, what would that room be used for? Now more than ever with the ongoing COVID crisis, I can think of many ideas for extra space: mini gym, meditation, homeschooling, zoom meetings, or a functioning living room for future movie nights.

A recent client of mine in Los Angeles had just moved into their dream home but shortly after was stressed out with the lack of storage. The house was a beautiful Spanish revival that had limitations for their belongings and it was imperative to come up with storage solutions that didn’t involve acquiring a storage unit. That is why their clutter ended up in the living room.

As with all projects, big or small, it is important to visualize what you want to use the space for, how you want it to look, and how it makes you feel. Before we jumped into the 5 step Space to Love® method to getting organized I wanted my client to convey to me what their vision was for the cluttered living room. They envisioned kid sleepovers, out of town family members staying for the weekend, having drinks with friends during game night and movie night with the family. This translated into a large and comfy sectional couch that opened up to a bed. The couch would have a dark-colored fabric that would be more forgiving of kids and pets. This layout also needed to include space for a bar and comfortable seating with side tables. This visualization process allows you to know what you need and is always a big motivator to get started on any project.

After visualizing we went on to assess and prioritize. We did a walkthrough of the entire house and outdoor space to see where, if any, would be an accessible and functional place for storage. I was pleased to learn that they had an unutilized basement. A basement in LA is a rare thing, and this one had ample space to add additional shelving. They had a garage that was being used as an extension of the outdoor space, not for a car. We decided to use one of the walls to build storage cabinets (that will be for another blog). Now, I was able to see where all the items that they wanted to keep would go.

After that, we were ready for the Space to Love® method. For the first step, Setup, we used foldout tables where we could group the like items together and see everything. We created areas in the room for the common categories, such as donations, trash, and recycle. With our post-its and markers ready we moved on to step two, Sorting.

While working through the sorting process I was able to learn a lot about my client. For instance, I could tell what they did for a living and what their hobbies were. This allowed me to come up with an organizational system that would be tailored to their individual needs.

As we continued sorting, everything made their way into specific categories. This allowed them to see which items they had duplicates of, what they forgot they had, and what they weren’t using. I love watching as my clients go through this process because they start to understand what they need, what they want for the future, and what is holding them back. It becomes clear to them how they have changed over the years and what was once important doesn’t have much hold over them anymore. This leads right into step three, Select.

Now that everything is sorted it makes it easier to “pick the best and get rid of the rest”. Here is where they see what is no longer serving or supporting them. This is also an opportunity for them to realize how they have been spending their money and their time. Sometimes feelings like guilt, shame, and regret may come up and bring the process to a halt. This is where having a professional organizer there with you is so important, we help ease the feelings that arise and get you through it. Real change starts to happen during this time. Many ah-ha moments.

After sorting and selecting, the items they decided to keep could be stored in the basement. Which brings us to step four, Sanitize.

We started with the basement. Before we added shelving from Home Depot we made sure we cleaned the area well. Then we put the shelving in place and organized them with items that were not going to be used on a regular basis. We transported the other items that were needed more often out to the garage on temporary shelving until the storage cabinets were built.

Once everything was moved out of the living room we were able to move onto the fifth step, Style. When it comes to living rooms the best place to start is with the couch. We went to The Joneses LA one of my favorite furniture stores in Los Angeles. We brought the measurements with us and presented them to the salesperson and from there we explored various ideas for the couch. We decided on a left side sectional with a chaise lounge that opened up to a kingsize bed. We were able to go through books of swatches to pick the perfect dark-colored fabric. As we perused the showroom we were able to see the different styles of couches and pick the one they liked the best.

Next, we chose to use a console they already owned that worked perfectly for the bar area. As for the window treatments, we went with The Shade Store on Melrose Ave. It was a treat to be able to view all the fabrics and look at the hardware to see how they worked.

We needed to paint the room and ended up choosing this rich dark blue. This color really made a bold statement in this living room and my client fell in love with it. No more boring here.

I love the transformation of this living room. What do you think? Is there a room you would like to transform?